An easy, free place, to explore and resource all things related to maintaining, renewing and re-cycling, old, worn jeans with tender loving care.


Sunday, December 26, 2010

DIY a charming Fascinator

Swedishloveaffair, has cleverly used this scrap of denim as a sturdy base, to make a charming New Year's Eve Fascinator. Click here for her super super easy and clear tutorial. All kinds of variations come to mind when one follows her lead -- from combining pinecones or pretty twigs from the garden (left natural or painted unexpected colors) -- to tiny bulbs mixed with feathered denim scraps ... hmmm ... Whether you will be at home, curled up in a pair of comfy jeans or enjoying a big bash, why not take a few minutes, to create your own accessory to ring in the New Year --and surprise us and yours, with your special, individual style!
With her natural and delightful imagination, Antonia shares on her blog wonderful advise and thoughts about fashion, style and handmade. Thank you Antonia for the great tutorial!
Wishing all my fellow bloggers a year of peace and happiness.
Enjoy the last days of 2010
and all my best wishes,
and hopes are with you for 2011!
xxxooo
Nancy

Monday, November 8, 2010

Pucci patched vintage jeans

This image, from "Sea of Shoes" expresses all the power of the individualism of the 60s. It looks like wonderful scraps of various printed Pucci fabrics (which could be printed on cotton velvet, silk or light weight wool jersey) have been wonderfully patched on those flared legs! What a delicious way to re-cycle a stained or torn, but beautiful scarf or blouse ... .

Tuesday, September 28, 2010

DIY Venetian Mask

Even though some of you may have seen this before, I'm posting it again, as it remains a wonderful way to use a scrap of denim. Add some glamorous beads, pearls, ruffles, whatever you find in your notions box - to hand stitch something magically special, for trick-or-treating later in October. Click here, where you can find all the instructions on craftzine.

Sunday, September 5, 2010

Creative denim tree decoration

Isn't it wonderful, when someone takes junk - like a pair of old jeans - and surprises you with the possibilities of what can happen when you creatively combine your imagination with some crafting skill - to transform those old cast-off jeans into another product, that is charming and useful. 
"Michele Made Me" has done just that - superbly, whimsically and artistically!
She cut the denim into strips, rolled them up and glued them into tree shapes. 

She then has used the trees to decorate many items, including the back-to-school pencil case in the top photo.  I loved her denim project and wanted so much to share the tutorial (click here). 
Hope it inspires you. 
Thank you Michelle!

Monday, August 16, 2010

Tutorial to turn jeans into a mini skirt

Bored and crafty has posted (right here) a detailed tutorial with lots of visuals and clear explanations on how to turn a pair of has-been jeans into a mini skirt.  All one needs is a little time and patience to receive a big heave of satisfaction and pleasure!

Thank you  Meream for sharing your wonderful tutorial!

Saturday, August 7, 2010

Super book sale!

As we gear up for fall and back-to-school, fresh additions to one's wardrobe give positive energy and pleasure.  This beret, one of the sewing projects in my book Denim Revolution, is made from a circle cut from a pair of old jeans!  It demonstrates that re-cycled style is super hip, and can be had, with a little creativity, some hand sewing and without a designer clothing budget. 
and ...
as a special boost for a super fall,

I hope you enjoy, your new denim treasures
as much as your old denim memories!
Happy sewing,
Nancy

Saturday, July 17, 2010

How to make adorable pants for your toddler from old jeans

CookCleanCraft, click here, has resourcefully turned a pair of denim rejects into a charming pair of pants for a toddler. I love the way she explains carefully all her steps and thought process, supported by lots of descriptive images. Her goal to be time efficient, get a good fit and integrate the original, stitching details, seems to have worked out beautifully. Thank you CCC for sharing this with my readers!

Wednesday, June 23, 2010

Bleached denim skirt from recycled kids jeans

This is a wonderully imaginative tutorials!
The SewingDork, takes you through all the steps, with lively images, so everyone can make her totally camp skirt - from a pair of cast-off kid's jeans. 
The tutorial is fun and I so love the cool look, for adults and kids. 
Thank you SewingDork for sharing it with us!

Saturday, June 19, 2010

Denim remake by the brassyapple

Megan at the brassyapple has created a Shaggy Mosaic Jeans pattern booklet, filled with plenty of ways (and 42 inspiring images) to remake jeans for all the family. Her bright, fun way to work patches makes me happy and I wanted to share it with you. 

Tuesday, June 8, 2010

Cropping jeans just at the knee

Jeans are being cropped, hemmed and cuffed
every which way as the weather warms up.
One version seems to be the current denim uniform
that encircle Central Park.

Saturday, May 29, 2010

DIY cropped, denim joggers


If you have a pair of naft jeans with no personality and you love denim and love the ease of joggers, then why not, follow your love – and crop and recycle those old jeans into something cozy, comfortable and cool to wear?  These cropped joggers are easy to make - and quickly become a favorite.

Level - some sewing (takes an hour) and knitting (another hour) experience is needed. If you are not a knitter cut the cuffs from a cast-off sweatshirt.

Materials:
Your cast-off jean
Ochre thread
4' x 5/8" wide, pink and white striped grosgrain ribbon
5' x 1" wide, lime woven braid
Note: Ribbons were chosen with different weaves and colors to create an imaginative mix and the yarns for how they compliment the ribbons and denim.  Follow my lead or rummage through your pile of notions and yarns and do it in another style.
1 skein Debbie Bliss Cotton Denim in Aran, 100% cotton yarn, 50 g/74 yards, color 14503,
1 skein Schachenmayr's Catania, 100% cotton yarn, 50 g / 135 yd, color citron
1 pair size 7 knitting needles
1 knitting sewing needle
3" carabiner
+ your basic sewing and knitting materials
How to Do It - Step-by-Step
Cut the Jeans:
Cut your jeans 2" below your knee and zigzag stitch the cut edge.  
Sew the Ribbon Trim:
Cut ½ yard off the lime braid and set aside for the loops.  
With 1/8" overlap, pin the two ribbons together, lengthwise.  
Baste, remove pins and machine zigzag stitch together.
Cut the length in half. Fold back the top edge ½" on one strip, align to the side seam where it joins the waistband and pin along the side seam, to the cuff. Trim any excess ribbon at the cuff. Baste in place, remove pins and zigzag stitch the ribbon around the perimeter. Repeat on the other side seam with the other strip of ribbon. 

Knit the Rib Cuffs:
Knit a pair of 1 x 1 rib cuffs. Directions for Small (Medium, Large) sizes correspond to a finished circumference of 3 ½", 4 ½", 5 ½".
Note: Check that the measurement will fit snug around your calf and adjust as necessary, adding or subtracting stitches in pairs.
With Cotton Denim Aran, cast on 45 (49, 53) stitches.
Row 1 (RS) K1, *p1, k1; repeat from * to end.
Row 2 P1, *k1, p1; repeat from * to end.
These 2 rows form the rib pattern. Repeat these 2 rows for 6 more rows.
Switch to Catania and work 2 rows.
Switch to Cotton Denim and work 2 rows.
Switch to Catania and work 2 rows.
Switch to Cotton Denim and work 2 rows.
Bind off all stitches using Cotton Denim. Cut yarn, leaving a 12" (30.5cm) length. Repeat for the second cuff.

Assemble the Knit Cuff:
Thread the extra yarn length on a knitting sewing needle and matching the stripes, sew up the rib seam on the wrong side. Securely knot all ends so they will not unravel. Repeat for the second cuff.
Attach the Knit Cuffs:
Fold the rib in half and pin the center of the fold to the cuff side seam. Align the seam of the rib cuff to the inside seam of the denim cuff. Stretch the ribbing, easing the knit rib evenly. The rib should overlap the denim ¾". Pin, baste and remove the pins. Hand stitch securely with the ochre thread. Remove basting. Repeat for the other cuff.  Lightly steam the seam.

Attach the Belt Loops:
Cut the remaining lime braid in half. Take one strip, overlap the ends 5/8" and stitch closed to form a continuous loop. Fold it in half. Pin on the front side waistband and fold it over the waistband (like above photo.) Baste, remove pins. Zigzag stitch in a cross as in the photo. Remove basting.
Repeat with the other strip, adding a loop on the back waistband. Hook a key carabineer on a loop, snap on a memento or cell phone – and you're off! Enjoy your comfy, cropped, denim-joggers!

Tuesday, May 25, 2010

DIY Denim Hobo Bag

Awhile ago my cousin was chatting about her beginner sewing adventures. So when I was recently in Portland, we caught up and she pulled out her in-progress denim “hobo bag.”  It certainly is a super solution for a pair of has-been jeans:
 - the legs have been cut off;
- the bottom sewn closed;
- a pair of comfortable denim straps were added, cut from the legs;
- and a cheerful lining is now pinned in place, ready to be stitched.
Thanks to Sandy, her neighborhood's amazing sewing whiz, who not only stitched together the charming patched lining to ensure a touch of polish, but also taught my cuz to pin, cut and sew the denim – including those long, hefty shoulder straps that she proudly pointed out.
I adore the collaboration and the generosity, of sharing sewing skills, patterns, creativity and leftover fabrics, with a true beginner. After further investigation, it seems that Sandy is sharing her knowledge all over the place.  She does all the mending at her local clothing redistribution center so that needy kids can dazzle with their "new" clothes.  And over the years she has taught Girl Scouts, exchange students, as well as her own children, to sew. (In fact, some of her Girl Scouts funded their way to Mexico and Europe by sewing and selling their wares.) She herself, learned to sew from sitting on her mother’s knee, Girls Scouts and Home Ec, back when it existed in schools.
Sewing stories are also stories about life!
Hmm…have you any sewing or mending adventures to share?

Monday, May 24, 2010

Jeans come in all sizes

Visiting dear friends ...
a mom, her daughter and growing son,
all in jeans,
every which way,
even in need of a touch up repair or two.

Saturday, May 15, 2010

How to turn your wide-legged jeans into to skinny-jeans

Guest post by the wonderful Mudnessa
(it was first spotted at the Greenists, an awesome place for all things green.)
Mudnessa writes:
I recently took an older pair of wide-legged jeans and made them into skinny jeans. Let me first state that I am a novice sewer, so if you have a sewing machine and have ever successfully used it, you should be able to accomplish this yourself. I did this for numerous reasons, mostly because I hate shopping for jeans. I also hate spending a ton of money on a pair and having to go home and basically deconstruct them to make them fit to my liking.

Step one: Turn the pair of jeans inside out and put them on.
Step two: Pin the inside seam to desired skinniness. When you do this, make sure the outside seam is on the outside of your leg evenly. Don’t make them too tight; you will need to be able to get your foot through the skinniest part. You will also probably want a bit of wiggle room so you can breathe and function in them. You may want to elicit the help of a friend with the pinning. I had to do this step twice because I was alone and the first time the pins turned out very crooked and there was no way I could sew a functioning seam.
Step three: Take the jeans off while still pinned to make sure you can get your feet out and they aren’t too tight; be careful not to stick yourself. I was still not comfortable with the pin line I had and was unsure I could sew a good seam. I put the jeans back on and to make it easier to sew a straight seam, I grabbed some tailors chalk and marked a line as straight as I could just inside the pin line, closer to my leg than the pin line.
Step four: Take the jeans to your sewing machine and sew them up. I sewed outside the chalk like, closer to the original inside seam, making them looser than the chalk line since I made the chalk line inside the pins. I started my seam on top of the existing seam a bit higher than my marked line so I wouldn’t end up with an odd bunch or dart, starting with a backstitch of course so it wouldn’t unravel. I continued the seam at an angle, meeting up with my chalk line and used it as an outside guide all the way to the bottom and ended it with a backstitch as well.
Step five: Cut off excess material. You may want to try them on first and make sure they fit to your liking before you cut them. I then needed to hem the bottoms since I usually wear heels; they were quite long and gathering a bit too much around my ankles.
Enjoy your new skinny jeans. It’s like having a new pair of jeans without the hassle of hours of trying on pants, only to be disappointed, and also without the dent in your wallet.

Monday, May 10, 2010

Jeanne's Jeans

When a mixed media artist starts to mend her husband’s jeans …
her artistic skills, vision and sensitivity are totally inspiring.
The jeans are a work in progress.
More holes, more repairs. 
I so look forward to her future postings.
 Thank you Jeanne Williamson for allowing me to post your incredible images!

Visit Jeanne's blog here to discover her jean story.

Friday, May 7, 2010

Basic 101 of jean repair

cat and mouse – a mending technique to cunningly patch jeans
the jean dilemma:
You have a pair of very cool jeans that you love and fit well but suddenly they are disintegrating into an annoying mess of holes. You want to maintain the fashionably distressed look but they desperately need mending.
the cure:
Mend them by integrating your stitches and handwork with the worn denim texture. To make them durable and chic you will fuse and patch on the inside and then re-enforce with stitching in the worn areas.
If you have some general sewing experience you can easily mend your jeans with this technique.
the sewing materials:
Medium weight, white iron-on fusing (enough to generously fit the area you are patching)
Cotton, medium weight fabric for the inside patch (same amount as fusing)
note: Search through your scrap bin for a cotton fabric that reflects the style of the wearer and the jeans. The plaid fabric used in this example is a good unisex option.
Cotton thread that matches your jeans
note: choose a shade that blends with the worn area you will be mending. A single pair of jeans has many different shades. Well matched thread is an important style element.
General sewing materials including: scissors, straight pins, hand sewing needle, sewing machine with a “denim sewing needle”, iron, ironing board, ruler or tape measure, seam ripper.
the sewing steps:
1. With your seam ripper open the side seam from a couple inches below the pocket to a couple inches above the cuff. note: In this way you will be able to easily maneuver around to stitch the patches.
2. Measure the area you want to patch, and cut the fusing to size accordingly. Note: The patched area in the example in the photos is the width of the front leg, from the side seam to the crotch seam. When jeans are quite worn like these it’s more efficient to patch the entire area, to avoid having to frequently make additional patches.
3. Using the cut fusing as your pattern, pin it on top of the plaid cotton. Cut the plaid ½” larger all around the perimeter. (If you happen to have pinking shears then use them.)
4. Turn your jeans inside out and press well the area you will patch, also smoothing and pressing neatly in place any loose denim threads.
5. Working on the inside of your jeans, lay the fusing, glue facing the denim, on the area you will be patching. Steam and press very well so that the fusing is permanently glued and secured in place. Any loose denim threads will also be fused, neatly in place. (above photo)
6. Pin the plaid patch on top of the fusing so the fusing is completely hidden behind the plaid patch. Baste all around, ¼” from the edge. Remove pins. (below photo)
note: the plaid patch will protect the fusing from rubbing loose from the jeans and also be feel more comfortable (a lovable denim characteristic…) than the fusing.
7. Turn your jeans right side out. As in the above photo, any loose denim threads have been glued neatly to the fusing. 
8.  Thread your sewing machine with the denim thread and set at a medium stitch length. Using the basting stitch as a guide, stitch all around the perimeter of the patch.
9. Machine stitch back and forth over every split, hole, exposed white denim threads and terribly worn areas. Sew more or less in parallel rows, and if it is an area that will get quite heavy wear, then re-enforce with zigzag or darning stitches. Sew until you are satisfied with the look and the durability. Your repairs will look like the photo below, quite invisible and blending with the naturally worn shade and coloration of the denim.
10. Pin the side seams together, baste and sew along the original stitching line.
11. Pull all the thread ends to the back and knot well. Remove any basting. Press.
You are finished, and it looks brilliant, perfectly distressed, super cool, and ready for a lot more wear!
(a similar, earlier version of this tutorial is also available here in pdf)

Friday, April 30, 2010

musing about mending


Sometimes after all my earnest goodwill and big plans, my patches just have not worked out…
or more accurately stated, my blue jeans are just a muddled, fuddled, puddle.
As a result, I'm confronted with the dilemma to either rip it all out and start over
or say farewell and bury the remains.
And so it has happened (more than once) that I've bit the bullet and ripped out a massive amount of stitches. This character building experience has convinced me that that not only is ripping out every stitch
actually doable,
but it is also
not so painful
and furthermore …
it feels rather virtuous!
Yes, one can honorably discover
(sitting in a hovel of blue threads)
that they have patience and willpower,
and good old-fashioned stubbornness.

Never the less, there are only so many hours in a day, and one wants to move forward as opposed to just treading water, so these valuable experiences need to be limited and avoided.

With that in mind, I put on paper some thoughts and lessons learned about mending denim that can be useful and amusing as you toil away or consider toiling away on your jeans. Some were passed along to me, others I learned from trial and error, books, blogs and through my own curiosity. Some of you may have seen this list here, but as a warm welcome to newcomers and with different sketches and a couple more ideas if it's the second time around -- polish your thimble - and here goes...
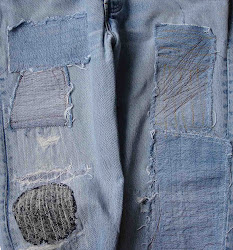
Soft, worn denim is very pliable. Handle it gently so it will not stretch out of shape when you mend.
Baste patches before sewing. In this way you won't be fighting a bundle of straight pins and your stitches will be much, more lovely and professional.

Most jean side seams are closed with one, easy to rip out row of stitching. Using your seam ripper, open it from a couple inches above the hem to a couple inches below the pocket. This will make it easy to maneuver around and stitch as you mend. When you have finished with all your repairs, re-stitch the side seam closed, along the original stitching line.

Patch the enlarged, worn area, not just a specific hole, as otherwise you will soon be mending again.
Make the inside as neat and tidy as the outside. This will make your repair more durable.

For added durability, secure with lots of back stitches.

Sandwich the thread end knots between the patch and the jean to avoid the knot rubbing open with wear.

Denim has a character all its own and will easily adapt to all sewing abilities so let your mending flow along and enjoy the satisfying pleasure of accomplishment.

Denim comes in many different shades. When choosing your thread, take your jeans along to the notions shop, as you will be surprised at how many color variations are possible. A shade matching the color of your jeans will be more subtle and blending, while a novelty color of thread, such as a bright red, metallic or ochre color, or embroidery floss, will be more decorative. All these choices are viable, interesting and effective – they are about expressing your individuality, creativity and style – so enjoy the process of choosing.

The thread color can make or break a look. Sew a test swatch, to check if you like the way the thread color matches or contrasts. In this way you can test freely and come up with unexpected colors. (Keep your test swatches in your re-cycle bin for future patches.)

Approach the thread and denim patch choices like a designer. Think about the characteristics that you love in the jeans and if you want to enhance those features, compliment or contrast them. You are going to re-make, re-invent your jeans with your own signature, one-of-a-kind detailing. It is a fun, creative, process. AND you deserve lots of kudos!

If you are not satisfied with the end results, grab your ripper, and take out the stitches and do it again. A favorite pair of jeans is worth the extra effort of creating something you adore.

Jeans in need of repair arrive in many different forms. Sometimes you have a favorite pair of jeans with a hip "worn-in" look, which is too fragile, breaking into annoying holes. Or you want to juice up a pair of boring jeans with some creative patchwork. Maybe the knees need to be strengthened. Choose the repair method that will be enjoyed by the wearer for both the durability and the style.

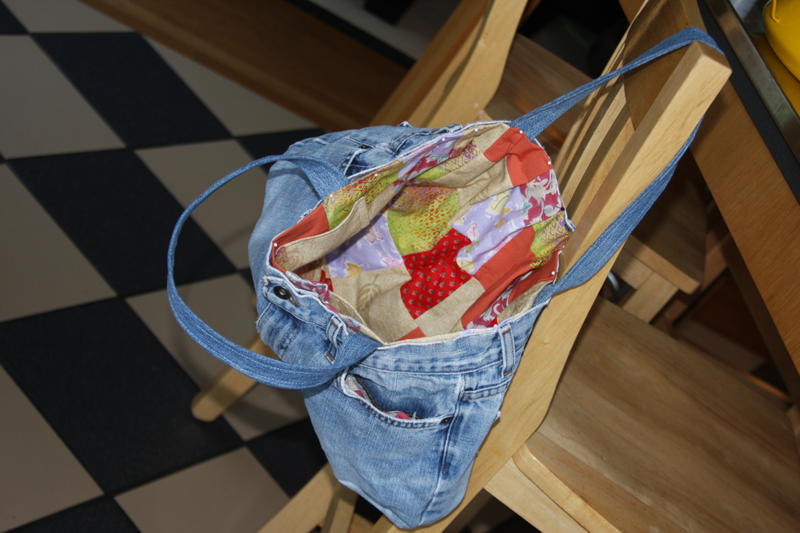
You can patch with a variety of materials – denim, printed cottons, or other novelty fabrics. But you do want the patch to be washable (for example, don't use leather.)

Patches can be cut in amusing shapes, such as flowers, butterflies or hearts.

Make the inside as beautiful as the outside. The wearer will enjoy the beauty every time they slip them on.

If it seems all too overwhelming, then pause, and make a pin cushion from denim scraps….

Denim can be tough like leather so use your thimble when hand stitching.
Sometimes the edges of a rip can be brought together and repaired so that the rip is almost invisible. Other times there is a missing gap. Either way, always let the denim lay naturally smooth and flat when you sew.
"Denim" or "leather" needles are handy for sewing heavier weight denim.

A machine stitch length of 8 to 12 is appropriate for basic denim, and 10 to 12 stitches for lighter weight denim.

You can straight stitch, zigzag stitch or hand stitch patches. It is all about style. Do you want it to contrast or blend? I've had to rip-out and re-sew patches when my plans just didn't make the cut. Check your idea on a small section to avoid my blunders.

Iron-on patches are another option. Follow the directions on the package and from my experience, reinforce with a stitch around the perimeter if they will get a lot of wear.

Press all your patches and jeans before sewing, so that you have a smooth and easy surface to sew.

Sometimes, you must admit, that a pair of jeans are simply no longer worth repairing. In that case, toss them into your re-cycle bin to use for other projects or patches. Old, worn denim has many surprising uses.

Since denim varies in color, keep all your old jeans, so that you will have a selection of shades to sort through when you are patching.

Denim patches are wonderful on all kinds of clothing, to hide moth holes in sweaters, patch sweatpants, t-shirts or jazz up something old.

And when you finish, celebrate your accomplishment.  Put on your "new" denim clothing, kick up your heels and enjoy your truly lovely, handiwork!

Best wishes for a nice weekend,

Sunday, April 25, 2010

Loving jeans


Dear friends,
you are warmly welcomed
to my new blog
created
just
for old, worn and lovable
jeans.
Dedicated,
with tender loving care,
to the enduring qualities
of our favorite,
old blue jeans,
I hope you will feel cozy,
enthusiastic and curious,
to wander freely and enjoy this comfy spot.

Though only an infant today,
will grow and prosper
with a rich variety of
creative ideas, useful links and tutorials
to stitch, patch and mend
your denim blues.
Join this blue community
from near and far.

Grab whatever you like!
Print it, use it or change it.

It's time to celebrate
let loose,
and whistle those soul-ful blues!
Yeah!!

And if you're wondering about me and how JeanRepair developed … well this is the tale, and it's one of those ordinary stories in life, with one thing leading to another and then another, without a clue of where I was headed.


It all started with having been designated, in my home, as the one that tattered jeans are brought to in need of repairs  (... which logically may be connected to my collection of every imaginable sewing apparatus from pins to threads stashed all over the house.)  So my devoted flock confidently hand me their jeans and casually ask if I could … "make them cooler" or "fix them for tonight" or "add something" (this is always rather vaguely described leaving much to the imagination) and "fix the holes." They expect miracles and I definitely don't want to disappoint (nor diminish my reputation or pride.) So I eagerly rise to their challenge.

These adventures, fortunately, always end with happy smiles. The owner proudly scampers off with their "new" jeans feeling resourcefully eco-clothed.  And I relish the sense of satisfaction and pleasure (admittedly also a sense of relief that the owner is delighted) from my handwork. Mending is a soothing craft a lot like knitting, and denim is a soft, interesting and easy cloth to sew. It virtually improves with wear and handwork. But learning how to mend jeans successfully has been sometimes an overwhelming journey.

There is no basic mending technique, but rather an endless flow of possibilities, depending on fashion's whims and the way jeans seem to magically adapt to the style of the owner. When you mend, you find yourself looking more closely at the jeans. You realize that no two pairs of jeans are the same and also, depending on your mood (yes it's that nonsensical) you can approach the work at hand differently on a different day of the week. Mending denim is not unlike a blank canvas offering the possibility of individual expression.  What worked on one pair does not necessarily work on the next pair. This is the denim charm and cause for its enduring universal appeal.

So through trial and error, ripping out and re-stitching, word of mouth, browsing through books, the Internet and my own imagination, I have developed a range of methods that incorporate both fashion as well as practical durability.


This bundle of information continued to grow, (along with my expanding pile of discarded denim scraps and waistline…) and finally it all needed desperately to be gathered together into a useful organized fashion. I started to write up the techniques, and post them on my other blog and Scrib. And as I stitched and wrote, I mused about you, and you and you, this wonderful global community of people near and far, who so imaginatively re-fashion and repair their jeans. And I was wondering how to bring us all together to share our enthusiasm, our wishes, interests and experiences. Jeans are after all about people. They weave our lives together through our practical needs, our desire to live a less wasteful lifestyle and our dreamy wishes.

So ...after this long tale, long trail and
direct and indirect inspiration,
the seed was planted that blossomed into
I'm most of all
simply happy you are here
and part of this denim journey!