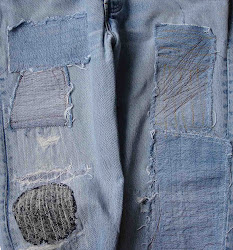
CookCleanCraft, click here, has resourcefully turned a pair of denim rejects into a charming pair of pants for a toddler. I love the way she explains carefully all her steps and thought process, supported by lots of descriptive images. Her goal to be time efficient, get a good fit and integrate the original, stitching details, seems to have worked out beautifully. Thank you CCC for sharing this with my readers!
Showing posts with label mending. Show all posts
Showing posts with label mending. Show all posts
Saturday, July 17, 2010
Friday, May 7, 2010
Basic 101 of jean repair
cat and mouse – a mending technique to cunningly patch jeans
the jean dilemma:
You have a pair of very cool jeans that you love and fit well but suddenly they are disintegrating into an annoying mess of holes. You want to maintain the fashionably distressed look but they desperately need mending.
the cure:
Mend them by integrating your stitches and handwork with the worn denim texture. To make them durable and chic you will fuse and patch on the inside and then re-enforce with stitching in the worn areas.
If you have some general sewing experience you can easily mend your jeans with this technique.Medium weight, white iron-on fusing (enough to generously fit the area you are patching)
Cotton, medium weight fabric for the inside patch (same amount as fusing)
note: Search through your scrap bin for a cotton fabric that reflects the style of the wearer and the jeans. The plaid fabric used in this example is a good unisex option.
Cotton thread that matches your jeans
note: choose a shade that blends with the worn area you will be mending. A single pair of jeans has many different shades. Well matched thread is an important style element.General sewing materials including: scissors, straight pins, hand sewing needle, sewing machine with a “denim sewing needle”, iron, ironing board, ruler or tape measure, seam ripper.
the sewing steps:
1. With your seam ripper open the side seam from a couple inches below the pocket to a couple inches above the cuff. note: In this way you will be able to easily maneuver around to stitch the patches.
2. Measure the area you want to patch, and cut the fusing to size accordingly. Note: The patched area in the example in the photos is the width of the front leg, from the side seam to the crotch seam. When jeans are quite worn like these it’s more efficient to patch the entire area, to avoid having to frequently make additional patches.3. Using the cut fusing as your pattern, pin it on top of the plaid cotton. Cut the plaid ½” larger all around the perimeter. (If you happen to have pinking shears then use them.)
4. Turn your jeans inside out and press well the area you will patch, also smoothing and pressing neatly in place any loose denim threads.
5. Working on the inside of your jeans, lay the fusing, glue facing the denim, on the area you will be patching. Steam and press very well so that the fusing is permanently glued and secured in place. Any loose denim threads will also be fused, neatly in place. (above photo)
6. Pin the plaid patch on top of the fusing so the fusing is completely hidden behind the plaid patch. Baste all around, ¼” from the edge. Remove pins. (below photo)
note: the plaid patch will protect the fusing from rubbing loose from the jeans and also be feel more comfortable (a lovable denim characteristic…) than the fusing.
7. Turn your jeans right side out. As in the above photo, any loose denim threads have been glued neatly to the fusing.
8. Thread your sewing machine with the denim thread and set at a medium stitch length. Using the basting stitch as a guide, stitch all around the perimeter of the patch.
9. Machine stitch back and forth over every split, hole, exposed white denim threads and terribly worn areas. Sew more or less in parallel rows, and if it is an area that will get quite heavy wear, then re-enforce with zigzag or darning stitches. Sew until you are satisfied with the look and the durability. Your repairs will look like the photo below, quite invisible and blending with the naturally worn shade and coloration of the denim.8. Thread your sewing machine with the denim thread and set at a medium stitch length. Using the basting stitch as a guide, stitch all around the perimeter of the patch.
10. Pin the side seams together, baste and sew along the original stitching line.
11. Pull all the thread ends to the back and knot well. Remove any basting. Press.
You are finished, and it looks brilliant, perfectly distressed, super cool, and ready for a lot more wear!
(a similar, earlier version of this tutorial is also available here in pdf)
Friday, April 30, 2010
musing about mending
Sometimes after all my earnest goodwill and big plans, my patches just have not worked out…
or more accurately stated, my blue jeans are just a muddled, fuddled, puddle.
As a result, I'm confronted with the dilemma to either rip it all out and start over
or say farewell and bury the remains.
And so it has happened (more than once) that I've bit the bullet and ripped out a massive amount of stitches. This character building experience has convinced me that that not only is ripping out every stitch
actually doable,
but it is also
not so painful
and furthermore …
it feels rather virtuous!
Yes, one can honorably discover
(sitting in a hovel of blue threads)
that they have patience and willpower,
and good old-fashioned stubbornness.
Never the less, there are only so many hours in a day, and one wants to move forward as opposed to just treading water, so these valuable experiences need to be limited and avoided.
With that in mind, I put on paper some thoughts and lessons learned about mending denim that can be useful and amusing as you toil away or consider toiling away on your jeans. Some were passed along to me, others I learned from trial and error, books, blogs and through my own curiosity. Some of you may have seen this list here, but as a warm welcome to newcomers and with different sketches and a couple more ideas if it's the second time around -- polish your thimble - and here goes...
Soft, worn denim is very pliable. Handle it gently so it will not stretch out of shape when you mend.
Baste patches before sewing. In this way you won't be fighting a bundle of straight pins and your stitches will be much, more lovely and professional.Most jean side seams are closed with one, easy to rip out row of stitching. Using your seam ripper, open it from a couple inches above the hem to a couple inches below the pocket. This will make it easy to maneuver around and stitch as you mend. When you have finished with all your repairs, re-stitch the side seam closed, along the original stitching line.
Patch the enlarged, worn area, not just a specific hole, as otherwise you will soon be mending again.
Make the inside as neat and tidy as the outside. This will make your repair more durable.For added durability, secure with lots of back stitches.
Sandwich the thread end knots between the patch and the jean to avoid the knot rubbing open with wear.
Denim has a character all its own and will easily adapt to all sewing abilities so let your mending flow along and enjoy the satisfying pleasure of accomplishment.
Denim comes in many different shades. When choosing your thread, take your jeans along to the notions shop, as you will be surprised at how many color variations are possible. A shade matching the color of your jeans will be more subtle and blending, while a novelty color of thread, such as a bright red, metallic or ochre color, or embroidery floss, will be more decorative. All these choices are viable, interesting and effective – they are about expressing your individuality, creativity and style – so enjoy the process of choosing.
The thread color can make or break a look. Sew a test swatch, to check if you like the way the thread color matches or contrasts. In this way you can test freely and come up with unexpected colors. (Keep your test swatches in your re-cycle bin for future patches.)
Approach the thread and denim patch choices like a designer. Think about the characteristics that you love in the jeans and if you want to enhance those features, compliment or contrast them. You are going to re-make, re-invent your jeans with your own signature, one-of-a-kind detailing. It is a fun, creative, process. AND you deserve lots of kudos!
If you are not satisfied with the end results, grab your ripper, and take out the stitches and do it again. A favorite pair of jeans is worth the extra effort of creating something you adore.
Jeans in need of repair arrive in many different forms. Sometimes you have a favorite pair of jeans with a hip "worn-in" look, which is too fragile, breaking into annoying holes. Or you want to juice up a pair of boring jeans with some creative patchwork. Maybe the knees need to be strengthened. Choose the repair method that will be enjoyed by the wearer for both the durability and the style.
You can patch with a variety of materials – denim, printed cottons, or other novelty fabrics. But you do want the patch to be washable (for example, don't use leather.)
Patches can be cut in amusing shapes, such as flowers, butterflies or hearts.
Make the inside as beautiful as the outside. The wearer will enjoy the beauty every time they slip them on.
Denim can be tough like leather so use your thimble when hand stitching.
Sometimes the edges of a rip can be brought together and repaired so that the rip is almost invisible. Other times there is a missing gap. Either way, always let the denim lay naturally smooth and flat when you sew.
"Denim" or "leather" needles are handy for sewing heavier weight denim.A machine stitch length of 8 to 12 is appropriate for basic denim, and 10 to 12 stitches for lighter weight denim.
You can straight stitch, zigzag stitch or hand stitch patches. It is all about style. Do you want it to contrast or blend? I've had to rip-out and re-sew patches when my plans just didn't make the cut. Check your idea on a small section to avoid my blunders.
Iron-on patches are another option. Follow the directions on the package and from my experience, reinforce with a stitch around the perimeter if they will get a lot of wear.
Press all your patches and jeans before sewing, so that you have a smooth and easy surface to sew.
Sometimes, you must admit, that a pair of jeans are simply no longer worth repairing. In that case, toss them into your re-cycle bin to use for other projects or patches. Old, worn denim has many surprising uses.
Since denim varies in color, keep all your old jeans, so that you will have a selection of shades to sort through when you are patching.
Denim patches are wonderful on all kinds of clothing, to hide moth holes in sweaters, patch sweatpants, t-shirts or jazz up something old.
And when you finish, celebrate your accomplishment. Put on your "new" denim clothing, kick up your heels and enjoy your truly lovely, handiwork!
Best wishes for a nice weekend,
Subscribe to:
Posts (Atom)


